
INSTALLATION GUIDE & BEST PRACTICES
How to Shingle a Roof: Step-by-Step Installation Guide
Installing asphalt shingles requires precise sequencing, proper underlayment integration, code-compliant fastener placement, and rigorous adherence to manufacturer specifications. Learn the professional step-by-step installation workflow from deck preparation to ridge cap finishing.
Important Safety & Code Notice
Safety First: Working on elevated roofs carries severe fall hazards. While OSHA regulations (29 CFR 1926 Subpart M) legally mandate personal fall arrest systems (PFAS) for employers and professional contractors at heights of 6 feet or more (with anchorages meeting 29 CFR 1926.502(d)(15) criteria of 5,000 lbs per employee or engineered with a 2:1 safety factor by a qualified person), DIY homeowners should adhere to these same vital safety measures: anchor with a certified full-body harness, position extension ladders on firm level ground at a 4:1 slope (1 foot out for every 4 feet of height), and never attempt roof work on wet, frosty, or moss-covered decking. Always consult and follow your specific shingle manufacturer’s printed application instructions to preserve warranty coverage.
Tools & Materials Checklist
- Materials: Architectural or 3-tab shingles, starter strip shingles, hip & ridge cap shingles, synthetic underlayment, self-adhering ice & water barrier, aluminum drip edge, 1-1/4″ galvanized roofing nails, roofing cement.
- Tools: Pneumatic coil roofing nailer (or roofing hammer), chalk line, utility knife with hook blades, tin snips, tape measure, flat pry bar, safety harness and anchor.
The 8-Step Shingle Installation Sequence
Step 1: Prepare and Inspect the Roof Deck
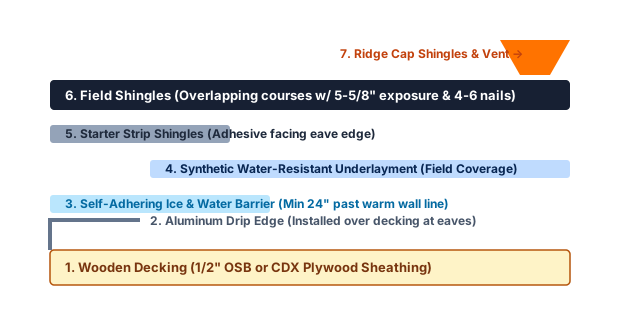
Ensure the plywood or OSB sheathing is completely dry, clean, and structurally sound. Replace any rotted, delaminated, or sagging boards ($7/16″$ OSB or $1/2″$ CDX plywood minimum). Drive all protruding fasteners flush with the deck.
Step 2: Install Drip Edge & Ice Barrier at Eaves
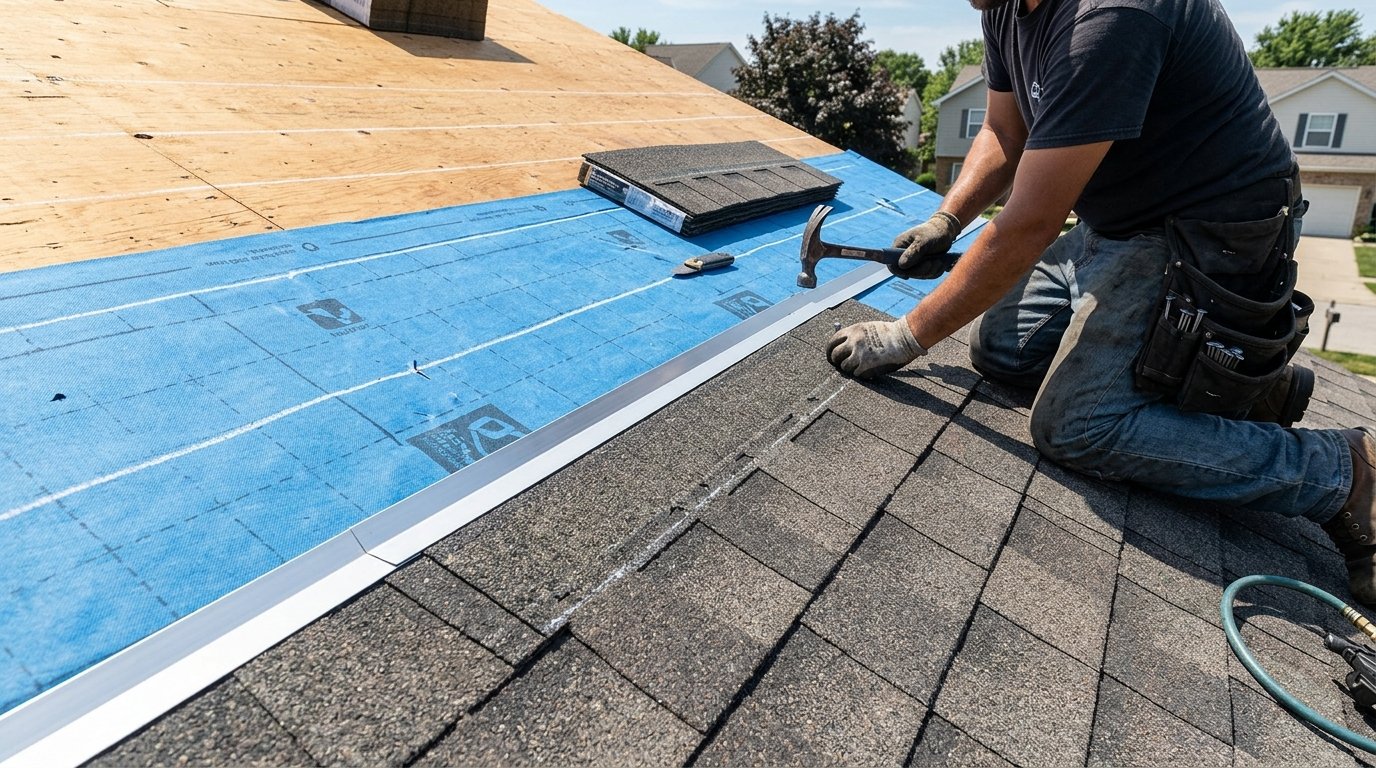
- Fasten metal drip edge along the lower eaves directly to the bare wooden decking with nails spaced every 8 to 10 inches.
- In cold climate zones (IRC §R905.1.2), install self-adhering ice and water membrane extending from the eave edge to at least 24 inches inside the interior heated wall line.
Step 3: Lay Synthetic Underlayment
Roll out synthetic underlayment horizontally starting from the eave up toward the ridge. Overlap horizontal seams by at least 2 to 4 inches and end laps by 6 inches. Fasten with plastic-cap nails spaced every 12 inches along laps.
Step 4: Install Rake Drip Edge & Chalk Lines
Install rake drip edge along the gable roof edges over top of the underlayment (this prevents wind-driven rain from getting underneath the membrane). Snap horizontal and vertical chalk lines across the roof to maintain straight, uniform courses.
Step 5: Install Starter Strip Shingles
Apply pre-cut starter strip shingles along all eaves and rakes with the adhesive sealant strip positioned downward and closest to the roof edge. Overhang the drip edge by $1/4″$ to $3/4″$. Starter shingles prevent wind lift at the roof perimeter.
Step 6: Fasten Field Shingles
Begin installing the first course of field shingles flush with the starter course:
- Nail Placement: Drive 4 nails (or 6 nails in high-wind regions) directly through the designated manufacturer nailing strip, positioned below the sealant line.
- Course Offset: Stagger subsequent courses by 6 inches (or manufacturer step-offset pattern) to ensure vertical joints never align between consecutive courses.
- Exposure: Maintain exact manufacturer exposure (typically 5-5/8 inches for architectural shingles).
Step 7: Flash Valleys, Chimneys & Plumbing Boots
Install closed-cut or open metal flashing in roof valleys. Slide pre-formed rubber/aluminum pipe boots over plumbing vent stacks, overlapping lower shingles and weaving upper shingles over the flashing flange.
Step 8: Cap Hips and Ridges
Finish roof peaks by installing specialized hip and ridge cap shingles. Bend cap shingles symmetrically over the ridge, fastening each with two 1-3/4″ to 2″ nails, working opposite prevailing wind direction.
Related Estimators & Guides
Calculate your project materials with our Shingle Calculator, determine waste margins with our Roof Waste Calculator, and verify fastener specs in our Roofing Nail Size Guide.